Stage 02 Manual — Bench Architecture

Packing: Arrange the Working Reach

Look at most struggling packing tables and you will see the same three faults: flat boxes piled on the work surface, a roll of plastic tape sliding onto the floor, and a packer bending down 120 times a day to pull void fill from a bin behind their heels. Over a four-hour packing session, those wasted reaches add two miles of unnecessary body movement and lead to crooked tape seams and mislabelled boxes.

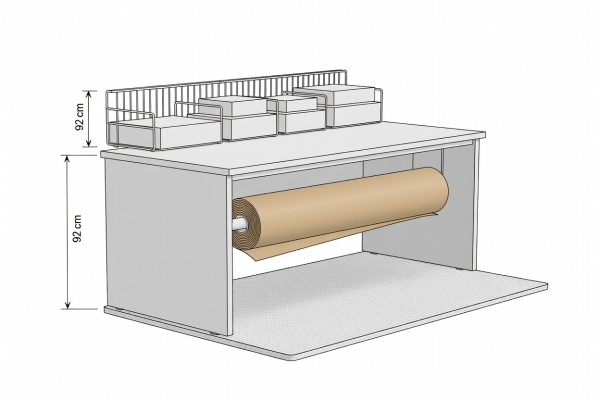
A dedicated 180 cm × 80 cm industrial workbench, built with vertical storage above and beneath the tabletop, keeps the central assembly zone completely clear for folding, weighing, and sealing.

Flat vector architectural elevation of an ergonomic packing bench showing 92cm surface height, overhead wire dividers for 5 box sizes, under-bench kraft paper roll, and anti-fatigue floor mat

The Three Horizontal Reach Arcs

Industrial ergonomists divide a standing workbench into three concentric semicircles radiating from the packer's elbows. Every tool on your station must earn its coordinate based on how many times per parcel you touch it.

Primary Zone (0 – 40 cm Radius)

The Active Assembly Square

This area sits directly in front of the torso without extending the upper arm. Nothing lives here permanently except the recessed or low-profile USB digital scale pad and a non-slip rubber mat for folding cartons. Keep mugs, phones, spare rolls of labels, and personal clutter strictly out of this 60 × 45 cm rectangle.

Secondary Zone (40 – 65 cm Radius)

Single-Reach Tools & Dispensers

Reached by extending the forearm without bending the spine. Place your water-activated gummed paper tape dispenser (such as a Better Packages 333 manual lever unit) at 45 degrees on the dominant-hand side, your 4×6 thermal printer immediately adjacent, and your barcode scanner in a weighted cradle.

Overhead Cantilever Rack (135 – 160 cm Height)

Vertical Carton & Mailer Dividers

Install a steel upper shelf with adjustable vertical hoop dividers 45 cm above the work surface. Store flat-packed corrugated boxes vertically by size from smallest on the left to largest on the right. Pulling a carton downward into the assembly zone takes two seconds and leaves the tabletop 100% open.

Under-Bench Frame (20 – 70 cm Height)

Kraft Roll Axle & Recycling Chute

Mount a 60 gsm recycled kraft paper roll on a horizontal dowel beneath the rear edge of the bench so paper feeds up through a rear slot. Reserve the lower-left shelf for spare label rolls and a pull-out bin on the lower-right for backing paper and carton offcuts.

Strict Left-to-Right Parcel Flow

Whether your room runs left-to-right or right-to-left, work must travel in a single straight line. Crossing unsealed items over sealed parcels is the primary cause of duplicate shipping labels and missing inserts.

1. Infeed Staging (Far Left, 0–45 cm)

The picked tote trolley docks flush against the left edge of the bench at tabletop height (92 cm). The packer scans the tote barcode or top packing slip, triggering the screen to display the order contents and recommended carton code (e.g., BOX-M2).

2. Fold, Cushion & Verify (Centre, 45–135 cm)

Pull the specified carton from the overhead divider, crease the base flaps, and fire one measured strip of reinforced water-activated tape across the bottom seam. Place crumpled kraft dunnage at the base, verify each item from the left tote into the box right on top of the scale, add the dispatch note, and seal the top H-seam.

3. Weigh, Print & Apply (Right, 135–180 cm)

With the sealed box resting on the central scale, press the foot pedal or hot-key to confirm weight and spit out the 4×6 thermal label. Apply the label smoothly to the largest flat upper surface—never wrapping the barcode over a box corner or tape seam—and slide the parcel off the right edge into the waiting courier sack.

4. Lighting, Mats & Noise Control

Suspend a 4000K neutral-white LED batten (minimum 500 lux at bench level) directly under the overhead carton shelf so shadows never obscure small SKU numbers. Pair the bench with a 15 mm closed-cell nitrile anti-fatigue mat to protect knees and lower backs during peak November–December shifts.

Standard 180 cm Single-Operator Bench Specification

Use these dimensions when building a timber workshop bench or ordering boltless steel framing for a small unit.

Station Element Recommended Specification Placement Coordinate Operational Purpose
Worktop Surface 1800 mm × 800 mm, 25 mm MDF or laminated birch, 920 mm height Main frame Matches standing elbow height for 90% of operators without stooping.
USB Digital Parcel Scale 30 kg capacity, 5 g resolution, stainless platform (300 × 300 mm) Centre-front (X: 900 mm, Y: 150 mm) Allows packing directly on the load cell to avoid lifting heavy boxes twice.
Water-Activated Tape Dispenser Manual lever unit for 70 mm reinforced gummed paper tape Right-mid (X: 1350 mm, Y: 350 mm) Dispenses exact pre-set strip lengths (e.g., 45 cm) with one pull, bonding to carton fibres.
4×6 Direct Thermal Printer 203 dpi, fanfold rear-feed slot, peel-off bar enabled Right-front (X: 1550 mm, Y: 200 mm) Delivers peeled label directly to right hand at the moment top seam is taped.
Overhead Carton Dividers 7 adjustable wire bays, 400 mm deep, mounted 450 mm above worktop Full width overhead Holds 25 flats of each of the 5 core carton sizes plus padded mailers.

Next Stage: Match the Parcel to the Journey →